Hello friends, If you have a large worksheet data and also want to view or print that type of database by adding heading rows and columns on each page. So, today we discuss how you could easily Print Row or Column Headings on Each page after reading this article.
You can use given tip or trick in different versions of Microsoft Excel as per your requirement to quickly and easily show or print previous page row and column headings for the next all pages. Before doing this job first we have to know what is the row heading or column heading. Each row is identified by its row number which is known as “Row Heading”, these row headings are printed on the top of each page. Each column is identified by its column label which is known as “Column Label or Column Heading”, these column headings are printed at the extreme left side of each page.
Must Read: How to show or hide non printing characters in MS Word
Easily Print Row or Column Headings on Each page:
For Example: If you have a large worksheet data which has lot of records on multiple pages and you want to print row and column heading or repeat same row or column heading on multiple pages during the printing.
Method: To print Row and Column Heading:
If you want to Print Row or Column Headings on Each page then you have to take few given steps in active worksheet:
Step 1: First you have to open or create a worksheet(s) which you want to print.
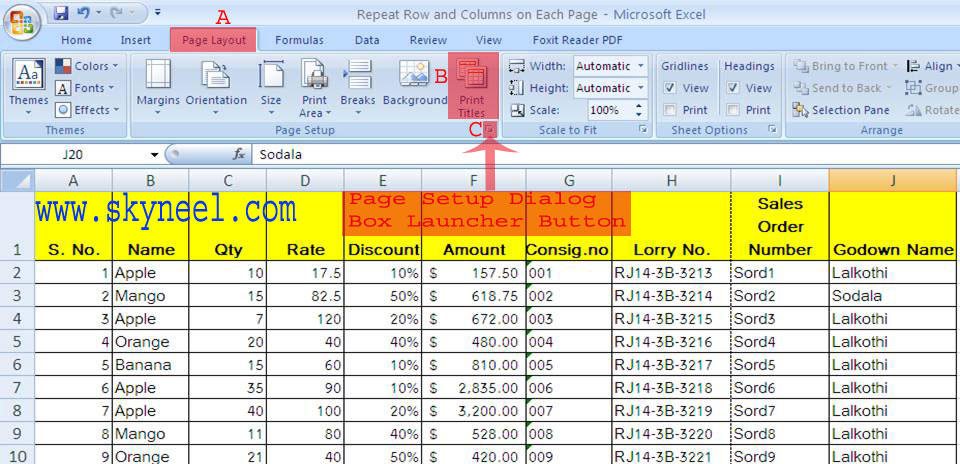
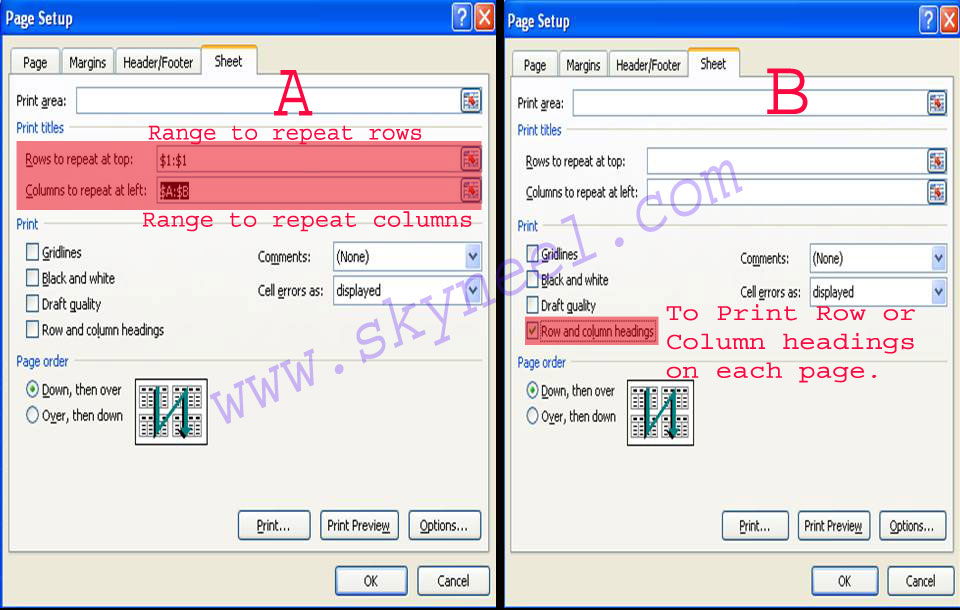
Step 2: Click on the “Page Layout” tab > Click Page Setup dialogue box launcher button > Click on the Sheet tab > Turn on “Row and Column Headings” option in “Print” category. If you want to check preview before giving print command then click on the print preview button, or if you want to directly print then click on the “Print” button otherwise click OK button to close this dialogue box.
Method: To print rows and columns heading on each page:
Step 1: First you have to open or create a worksheet(s) which you want to print.
Step 2: Click on the “Page Layout” tab > Now, click on the “Print Titles” button in “Page Setup” group or, You can also click on the “Page Layout” tab > Click Page Setup dialogue box launcher button > Click on the Sheet tab > There are two options are available in the Print titles category like rows to repeat at top and Columns to repeat at left.
If you want to set first row number for rest of the page then click on this option > Rows to repeat at top: Select the range or type like $1:$1 either by directly typing or click on the button which is placed on the extreme right side of the blank box.
If you want to set one or more column headings on the extreme left side on each page then you have to click in the blank box of Columns to repeat at left: Select the range or type like $A:$B either by directly typing or click on the button which is placed on the extreme right side of the blank box.
Step 3: If you want to check preview before giving print command then click on the print preview button, or if you want to directly print then click on the “Print” button otherwise click OK button to close this dialogue box.
Must Read: Vlookup merge data from one sheet to another Excel worksheet
I hope you like this Print Row or Column Headings on Each page guide. Give your important suggestions in the comment box and also share your knowledge with your friends, colleague, family members and others. Thanks.


anil
Nice tutorial please also provide how to use vloopup in different excel sheets