Hi, This is a tutorial to Root Redmi Y1 and install TWRP recovery. In this guide you will find all steps with image, therefore it is safe and easy method of Root Redmi Y1 and install TWRP recovery for Redmi Y1.
Redmi Y1 has Qualcomm MSM8940 Snapdragon 435 chipset along with 3/4 GB RAM and 64/32 GB ROM. This phone has 5.5 inches IPS LCD capacitive touchscreen with 720 x 1280 pixels. Redmi Y1 has 13 mega pixels rear camera with LED flash and 16 mega pixels front camera in Redmi Y1 .
Redmi Y1 is great phone and you must be root Redmi Y1, because root allows for you to use a maximum of your phone without any restrictions. After root you will install custom Rom, apps, and setting in your phone. But before root you must read Root Advantage and Disadvantage by this post. Then after follow these steps to root your phone.
Preparation of Redmi Y1:
1. First you should take a backup of your phone.
2. Your phone battery should be charge minimum 80%.
3. Make sure proper power backup of your PC.
4. Unlock bootloader Redmi Y1
Must Read: How to use Bokeh effect in Dual Camera Smartphone?
Download tool for root Redmi Y1 and install TWRP recovery
| Redmi Y1 USB Driver | Download |
|---|---|
| Redmi Y1 unlock bootloader | Download |
| Redmi Y1 TWRP Recovery | Download |
| Redmi Y1 SuperSU Zip | Download |
| Redmi Y1 Fast-boot tool | Download |
Steps to root Redmi Y1 and install TWRP recovery:
Step 1: Download and install Redmi Y1 ADB driver on your PC and enable Developer option and USB debugging mode on your Redmi Y1 by this guide . Download and copy SuperSU Zip file in the phone SD card. Now download and extract TWRP Recovery and Fast-boot tool and move TWRP Recovery (recovery.img) file in the Fast-boot tool folder. Then press and hold shift key in the keyboard and right click in the extracted Fast boot tool folder and select “Open command window here”. See in this image.

Step 2: Now connect Redmi Y1 with PC via USB cable and type adb reboot bootloader to boot your phone in the bootloader or fastboot mode. if this CMD command is not work for reboot bootloader or fastboot mode, then switch off your Redmi Y1 and press volume down and power button. You will get a vibration and your device will boot in recovery mode, then you select Reboot to Bootloader.

Note: Now your Redmi Y1 in the bootloader or fastboot mode, So you type fastboot devices in the command window then press enter key. This command show connected device in the command window and you can see your Smartphone serial number. If command window is not show your device serial number. Then install USB driver correctly or change your USB port of the PC.

Step 3: If your Redmi Y1 connected, then type fastboot flash recovery recovery.img command in the command window and press enter key to flash TWRP recovery on Redmi Y1.
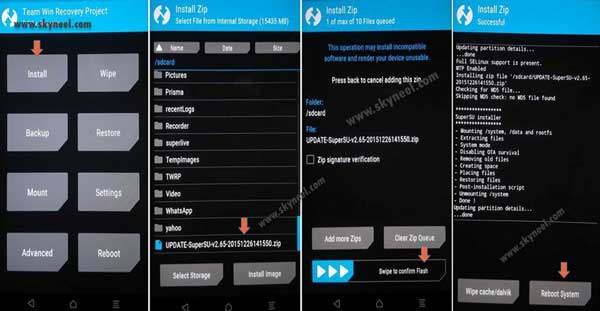
Step 4: Now type fastboot boot recovery.img to boot in recovery mode. Then tap on install tab or button and select “SuperSU.zip”file from your save location on your phone SD card and install this file.
Now reboot your phone. If you want to check your Mobile rooted or not try this app Root checker.
Must Read: How to Disable the Screen Lock feature in Redmi Y1
How to unroot Redmi Y1:
It is must for you to know, how to unroot Redmi Y1 Smartphone. When you feel that you don’t want rooted phone, then you can easily unroot your phone by un-install root app. Here is simple steps to unroot your device. You can also see unroot process in this image.
Step: First of all open Su App from your app menu and tap on Setting. Now scroll and find “Full Unroot” option and tap on it. that’s all.

I hope you like this root Redmi Y1 and install TWRP recovery guide from which you will be able to easily root Redmi Y1 and install TWRP recovery without any extra efforts. If feel any problem in this guide then please use comment box. Thanks to all.
Note: I am not responsible if you make Mistakes and Bricked Devices.