Hi, This is first new Lollipop update Gionee Elife S7 Stock Rom V3 and here is a easy and safe tutorial to install Lollipop update for Elife S7 Stock Rom V3. Gionee Elife S7 comes with 5.2-inch IPS LCD display which provides 1080 x 1920 pixels resolution. The Gionee Elife S7 is running on the Android 5.0 Kitkat operating system. Gionee Elife S7 powered by 1.7 GHz Octa-Core with Mediatek MT6752 Chipset.
Preparation of flash or update:
1. Take a backup of your phone Click here.
2. Your phone battery should charge 80% minimum.
3. Read all steps then do it careful.
4. Make sure proper power backup of your PC.
Must Read: Greenify app for slower and battery problem Android phones
Download ROM and Tools of Gionee Elife S7:
| File Name | Download link |
|---|---|
| Gionee Elife S7 Stock Rom V3 Lollipop 5.1 | Download |
| Gionee Elife S7 SP Tool V5.1616 | Download |
| Gionee Elife S7 USB Driver | Download |
How to install or flash new Lollipop update Gionee Elife S7 Stock Rom V3:
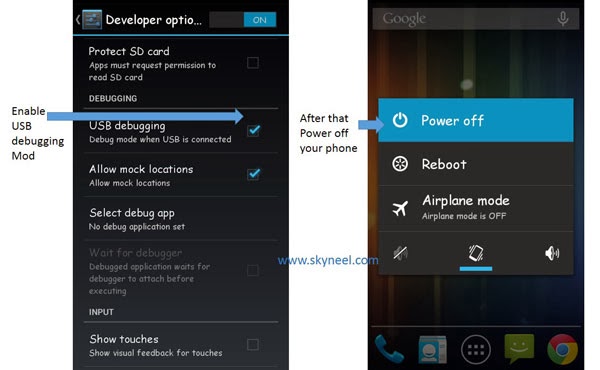
Step 1: Install drivers in your PC (If you feel any problem in install driver and Enable USB Debugging on your Phone. Go to Settings >>> Developer options >>> USB debugging check it ( If your phone have Android 4.2 or upper version then see how to enable Developer options here is guide of this Click here). After then switch off your phone.
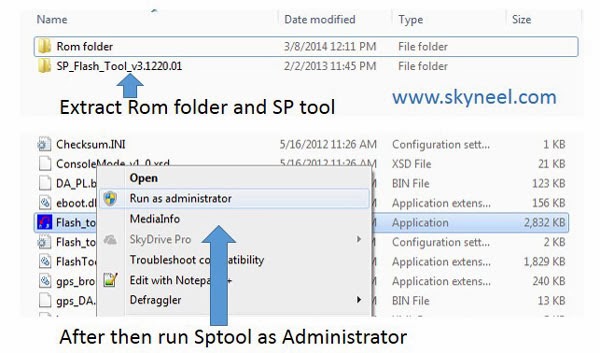
Step 2: Extract the Stock ROM folder where you want then Extract and open the SP Tool. and run Sptool.exe Run as Administrator
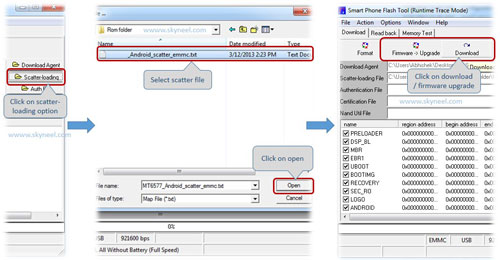
Step 3: You will see an SP tool window, now click on the scatter-Loading option in the SP tool. Then you will get the new tab of SP Tool which you ask the location of the scatter file on your PC. You will find this scatter file in the extracted Stock ROM folder. Now go to the Rom folder and select the file “Android_scatter_emmc.txt”. See in this image.
Step 4: Now You will see two options for flashing Rom, first is “firmware upgrade” option which is used to update or flash your Rom without deleting your data and second one is “Download” option this is work for format your phone then flash Stock Rom ( like fresh Rom installation). So choose according to your requirement and I suggest, click on the “Download” option and flash fresh Rom on your phone.
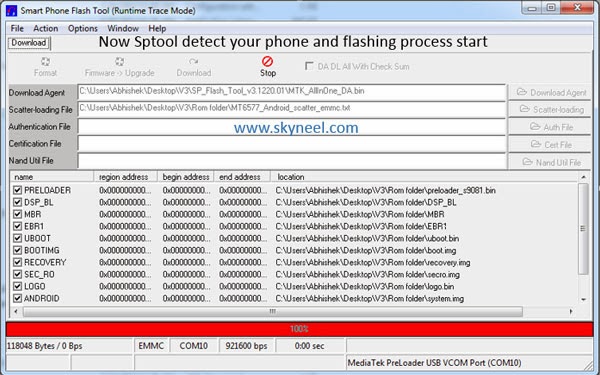
Step 5: Now connect your switch off phone to the PC via USB cable (Make sure your phone is switched off). SP Tool detect your phone and process will start. See in blow image. If Sptool is not recognize/detect your phone then install vcom driver read this post it will help you click here (Driver already in phone flash drive if you don’t have these drivers then install it)
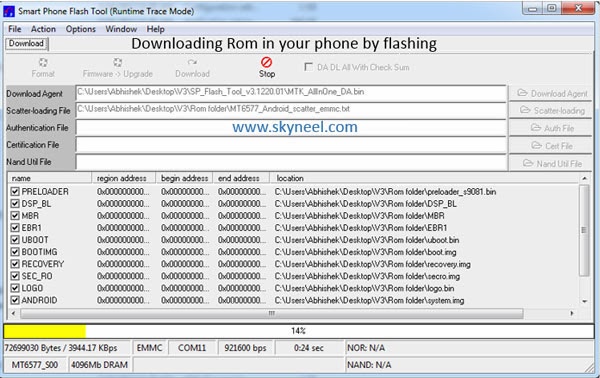
Step 6: Now Sptool start downloading Stock Rom in your phone by flashing.
Note: Don’t interrupt this process as it can potentially brick your device. Make sure no power interruption takes place.
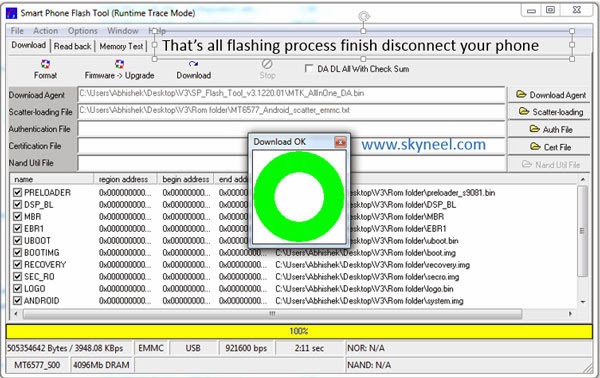
Step 7: After the process complete, a green ring will appear.
Step 8: Disconnect your phone. Now your phone is updated.
Must Read: How to install custom fonts in Android phones
After install new Lollipop update Elife S7 Stock Rom V3, you can root your phone because root allows you to use a maximum of your phone without any restrictions. After root you will install custom apps, Rom and custom setting in your phone. But first read Root Advantage and Disadvantage by this article.
I hope you like this new Lollipop update Elife S7 Stock Rom V3 installation guide from which you will be able to easily install new Lollipop update Gionee Elife S7 Stock Rom V3 without any extra efforts. If feel any problem in this guide then please use comment box. Thanks to all.
Note: I am not responsible if you make Mistakes and Bricked Devices.
