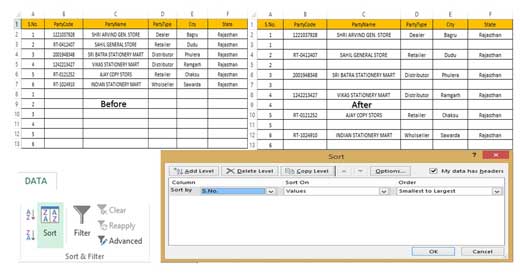
Sometimes, during working on any excel sheet you need to insert a blank row between existing each rows of data in Excel. If you need to insert few rows only then you can use any shortcut key or use insert command.
Must Read: Prevent duplicate values with Data Validation in MS Excel
If you insert more than one approx hundreds of blank rows, it will be a difficult task to inserting the row. Here we discuss an easy to use quick trick which helps you to solve your problem and you can easily insert an empty row between each row of data in Excel.
All we know Excel is an important utility application software, which helps you to solve complex calculations. There are different tips and tricks of Excel, which helps you lot and reduce your time. Rows and columns are an important part of Excel, where you can feed different types of data in active worksheet. During working on large worksheet data, if you need to manually insert a blank row between existing each row of data in Excel, is tedious task. This task too much difficult for novice excel users also.
How to Insert a blank Row between existing each Rows of data in Excel
If you want to insert a blank row between an existing each Rows of data in Excel sheet then you have to take few given simple steps.

Step 1: Below the active worksheet insert more than one same serial number. For e.g. You have to again type 1 to 6 serial number in A column.
Must Read: Excel VLookup Find First, 2nd Or Nth Match Value in Excel?
Step 2: After filling the same serial number from A8:A13, select the range of cells A1:I13.
Step 3: Click on the Data tab and choose Sort command. You can also press right mouse button and choose “Custom Sort” option on selected range of cells.
Step 4: Sort first column with ascending to descending order. After sort all the selected rows you can check excel insert a blank row between existing each row of data.
2 Methods to insert more than one columns and rows in Excel
Rows and columns plays an important role to filling different type of data in any active worksheet. Sometime during working in any worksheet you need to insert more than one columns and rows in Excel. There are lot of novice users have to face difficulty to quickly insert more than one columns and rows in Excel.
Must Read: How to use Double VLookup in Excel
There are different version in which most of the users are working on daily basis to prepare different kind of reports. If you are working on Excel 2007 or above then you by default you have 1 to 1048536 rows and A to XFD (16384) columns in a worksheet. When you insert any new worksheet then by default you have same number or rows and columns. You can quickly insert more than one columns and rows in Excel.
Quick way to delete blank cells using sort command in Excel
During working on large worksheet we have to face lot of blank cells in Microsoft Excel. If you want to delete blank cells one by one then it will take lot of time. We don’t have enough time during preparing few urgent reports. In that situation most of the users want to search a quick way to delete blank cells using sort command in Excel.
There are lot of ways from which you can easily delete blank cells in Excel. You can choose any required method to delete blanks cells from active worksheet in Excel. We already discuss delete blank cells in Excel using Filter and Go to special command in our previous article. Today we have to discuss another quick way to delete blank cells using sort command in Excel.