Hi, This is a tutorial of root Xiaomi Redmi Note 3G MIUI 7 and install TWRP recovery. In this guide you will find all steps with image, therefore it is safe and easy method of root Redmi Note 3G MIUI 7 and install TWRP recovery.
Xiaomi Redmi Note 3G has 1.7GHz Octa core processor along with 2GB RAM and 8GB ROM. This phone has 5.5 inches IPS screen size with 1280*720 pixels. This phone has 13 mega pixels rear camera with LED flash and 5MP front camera in Xiaomi Redmi Note 3G.
Xiaomi Redmi Note 3G is great phone and must be rooted because root allows for you to use a maximum of your phone without any restrictions. After root you will install custom Rom, apps, and setting in your phone. But before root you must read Root Advantage and Disadvantage by this post. Then after follow these steps to root your phone.
Preparation of flash or update:
1. Take a backup of your phone Click here.
2. Your phone battery should charge 80% minimum.
3. Read all steps then do it careful.
4. Make sure proper power backup of your PC.
Must Read: How to change Boot Animation in Android phone in easiest steps
| FILE NAME | DOWNLOAD LINK |
|---|---|
| Scatter file of Xiaomi Redmi Note 3G | Download |
| SP-Tool v5.1352 for Redmi Note 3G | Download |
| Driver for Xiaomi Redmi Note 3G | Download |
| TWRP Recovery for Xiaomi Redmi Note 3G | Download |
| SuperSU Zip for Xiaomi Redmi Note 3G | Download |
How to root Xiaomi Redmi Note 3G MIUI 7 and install TWRP recovery:
Step 1: First of all you must have to enable Developer option then enable debugging mode on your phone, here is guide click here. Now Install USB drivers on your PC.
Step 2: Download SuperSU file and copy in your phone memory card. Now Download CWM recovery and scatter file and extract these file in a folder where you want to save. Extract and open the SP Tool and run Sptool.exe Run as Administrator.

Step 3: You will see an SP tool window, now click on the scatter-Loading option in the SP tool. Then you will get the new tab of SP Tool which you ask the location of the scatter file on your PC. Now select the “MT6592_Android_scatter.txt” file. See in this image.

Step 4: You can see RECOVERY already selected and SP Tool show these file location. Now click on Download option in the Sp Tool, then connect your switch off phone with PC via USB cable (Make sure your phone is switched off).
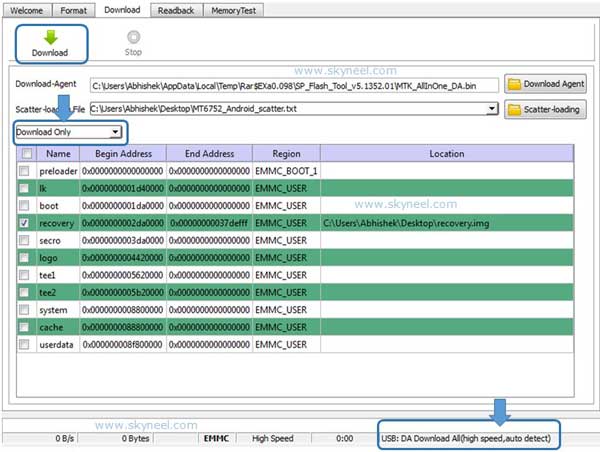
Step 5: SP Tool detect your phone and process will start. If Sptool is not recognize or detect your phone then install vcom driver read this post it will help you click here (Driver already in phone flash drive if you don’t have these drivers then install it)
Note: – Don’t interrupt this process as it can potentially brick your device. Make sure no power interruption takes place.
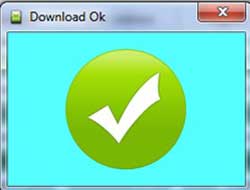
Step 6: After the process complete, a green ring will appear.
Step 7: Disconnect your phone. Do not start your phone. Press and hold vol. up & down + power button then select “recovery mode” (If your touch not work then use volume up and down key for menu up and down and Power button as a enter button)

Step 8. Click on install button/ choose install and select “SuperSU.zip”file from your save location on your SD card and install this file. Now reboot your phone. .
.
Must Read: How to install custom fonts in Android phones
This is simple and easy root Xiaomi Redmi Note 3G MIUI 7 and install TWRP recovery guide for your device. I can try to make it easy and make all steps clear to understand and try to make image all step for you. If your feel any problem then please comment us. I try to best resolve your problem.
Note: I am not responsible if you make Mistakes and Bricked Devices.
isdik117
Hi,
Thank you so much for this Guide, I just rooted my Redmi Note 3g MIUI 7 Successfully. At first I was bit confused since nothing was happening after I clicked download, later I found that it was due to MTKDriverW1152 not installed in my PC. After I installed this driver then root went smoothly…
Once again thanks for this post… Its really helpful